

Table of Contents: Christmas Lush
Christmas Lush
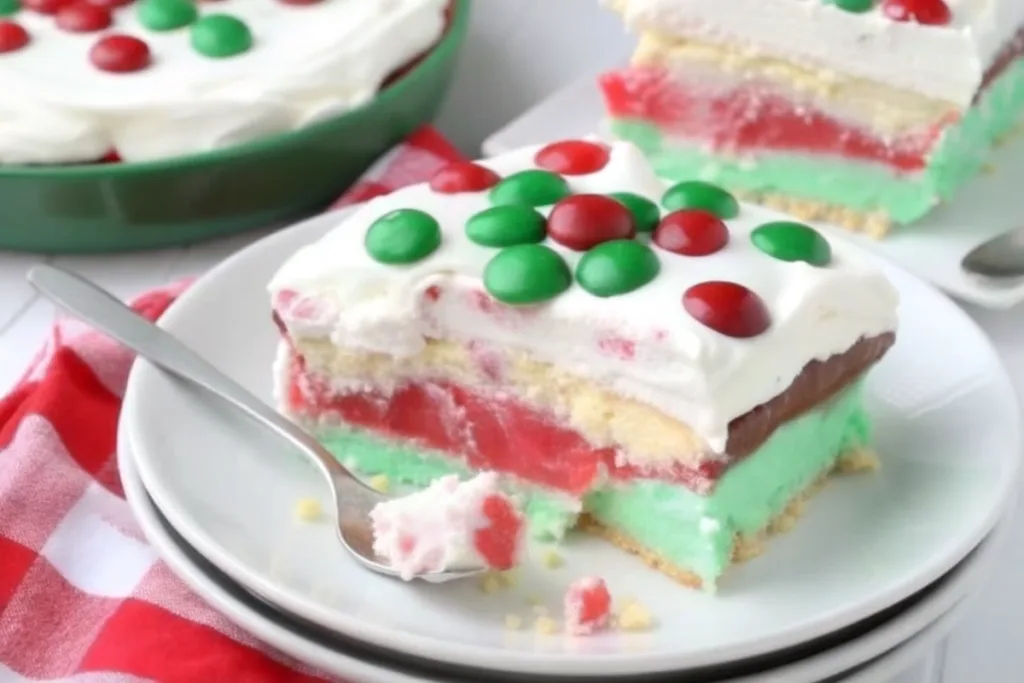
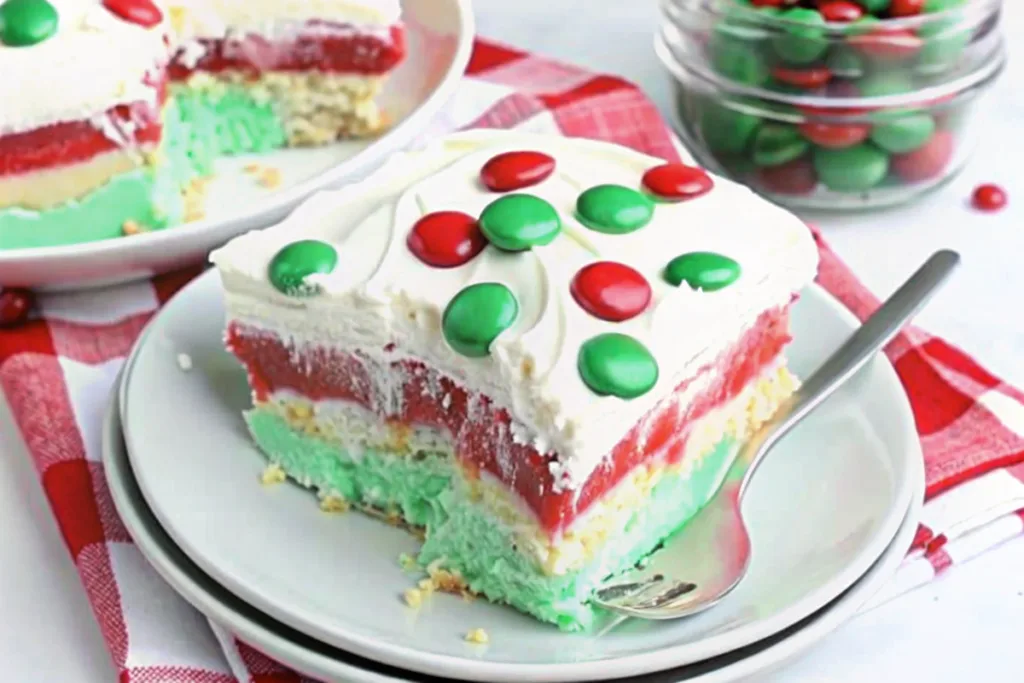
Red, green, and dreamy—this elegant layered dessert will steal the spotlight at your next holiday gathering!
Introduction: A Festive Creamy Christmas Treat Perfect for Any Gathering
When the holidays roll around, there’s one dessert that brings both nostalgia and convenience to the table: the Creamy Christmas Treat known affectionately as Christmas Lush—a stunning Layered Christmas Dessert that’s as easy to make as it is impressive to serve. With its vibrant holiday colors, luscious texture, and holiday no-bake dessert appeal, this recipe is a favorite among home bakers aged 40–65+ who remember the golden era of gelatin desserts—but with a modern, crowd-pleasing twist.
What makes Christmas Lush so special? It’s a holiday no-bake dessert built on a rich, nutty crust layered with creamy cheesecake-style fillings, sweet red gelatin, fresh strawberries, and fluffy whipped topping. Think of it as your family’s favorite cheesecake met a retro Jell-O salad—and had a delicious holiday baby. Whether you’re hosting Christmas dinner, a New Year’s Eve soiree, or simply need a festive sweet to pass at the office potluck, this creamy Christmas treat hits all the right notes: easy to make, visually striking, and deeply satisfying.
Beyond looks, its no-bake nature means less stress and oven-free space during the busiest cooking week of the year. Plus, it’s easy to customize, make-ahead, and delight kids and adults alike. With a little planning, your Layered Christmas Dessert can chill quietly in the fridge while you focus on main dishes, appetizers, and enjoying time with loved ones. Make it once, and it may just become your new holiday tradition.
Perfect for Christmastime, winter gatherings, or any celebration where you want a holiday no-bake dessert that feels fancy without the fuss, Christmas Lush proves that sometimes the simplest treats are the most beloved.
Alternate Names & Variations
This beloved treat goes by many names depending on region and family tradition. You might find it labeled as:
– Christmas Delight
– Holiday Glow Dessert
– Red & Green Lush
– Creamy Christmas Parfait
– Festive Layered Jell-O Delight
Some families call it a “lush” because of its lush, indulgent layers and rich texture—more on that in the FAQs! Variations include swapping lime gelatin for lemon for a milder first layer, using mixed berries in the top layer, or even adding a layer of mini marshmallows for extra nostalgia. For a holiday no-bake dessert with a tropical twist, try pineapple gelatin and diced oranges. The possibilities are endless, but the classic Creamy Christmas Treat remains a seasonal staple.
Ingredients: Christmas Lush
CRUST:
- – 1 cup all-purpose flour
- – 2 tablespoons granulated sugar
- – ¼ cup finely chopped nuts (pecans or walnuts)
- – ½ cup (1 stick) unsalted butter, softened
FIRST LAYER (Green Cream Layer):
- – 1 cup boiling water
- – 1 small box (3 oz) lime gelatin
- – 1 (8 oz) package cream cheese, softened
- – 1 (8 oz) container whipped topping (Cool Whip), thawed
- – Green food coloring (optional, for festive color)
SECOND LAYER (White Cream Layer):
- – 1 (8 oz) package cream cheese, softened
- – ½ cup granulated sugar
- – 1 (8 oz) container whipped topping (Cool Whip), thawed
TOP LAYER (Red Gelatin & Fruit):
- – 2 cups boiling water
- – 2 small boxes (3 oz each) strawberry gelatin
- – 4 cups fresh sliced strawberries
ADDITIONAL TOPPINGS:
- – Extra whipped topping (for piping)
- – Holiday sprinkles or festive candy (jelly rings, cranberry jell balls, or mini gumdrops)
Chef Tip: For best results, use full-fat cream cheese and real whipped topping—not aerosol whipped cream—for the ideal creamy consistency.
Step-by-Step Instructions
1. Preheat oven to 350°F. Lightly grease a 9×13-inch baking dish or glass casserole with cooking spray or butter. This helps prevent the crust from sticking and makes removal easier later.
2. Mix crust ingredients. In a medium bowl, combine flour, sugar, and chopped nuts. Cut in the softened butter with a fork or pastry cutter until the mixture resembles coarse crumbs and begins to clump together.
3. Press into dish. Transfer the mixture to the prepared dish and press it firmly and evenly into the bottom. Bake for 15–17 minutes or until lightly golden. Remove from oven and let cool completely on a wire rack (about 30 minutes). Chef Tip: A cooled crust ensures the gelatin layers set properly and don’t melt.
4. Make the First Layer. Stir boiling water into the lime gelatin in a bowl until fully dissolved (about 2 minutes). Let it cool slightly (5–10 minutes). In a large bowl, beat the softened cream cheese until smooth and fluffy. Gradually mix in the cooled gelatin, then gently fold in the whipped topping. For a more festive green, add a few drops of green food coloring. Spread this mixture over the cooled crust, smoothing with a spatula. Chill in the refrigerator for 30 minutes.
5. Prepare the Second Layer. While the first layer sets, beat the softened cream cheese in a clean bowl until smooth. Gradually add the sugar and beat until well blended. Fold in the second container of whipped topping. Spread this neutral-tasting cream layer over the chilled lime layer. Smooth the top evenly. Return to the fridge for another 30 minutes.
6. Create the Top Layer. Pour 2 cups of boiling water into the strawberry gelatin and stir until completely dissolved. Let it cool to room temperature (about 20–30 minutes) to avoid melting the cream layers. Important: This step is critical for a clean layer and solid set.
7. Assemble fresh fruit. Evenly scatter the sliced strawberries over the second cream layer. Gently pour the slightly cooled strawberry gelatin mixture over the berries. The gelatin should settle around and over the fruit. Chill for at least 2 hours, or until fully set.
8. Decorate before serving. Once firm, pipe whipped topping around the edges or in swirls. Garnish with sprinkles, holiday candy, or even candied nuts. For a showstopping finish, place a strawberry or holly sprig on each slice.
9. Chill until ready to serve. The Layered Christmas Dessert is best served cold from the fridge. Slice carefully with a clean knife (dipping in warm water between cuts for clean lines).
Recipe Card Block (Quick Reference)
This holiday no-bake dessert delivers a Creamy Christmas Treat with only 25 minutes of active prep time, zero oven use after the crust, and a total time of 3 hours 30 minutes (including chill time). Makes 12 generous servings, perfect for feeding a crowd. Each slice contains approximately 290 calories, with a balance of indulgent creaminess and juicy fresh fruit. Ideal as a centerpiece dessert or potluck dish during Christmas, Hanukkah, or winter family gatherings.
Why This Recipe Works & Expert Tips
Christmas Lush stands out because it combines retro charm with modern ease—a true holiday no-bake dessert that impresses without requiring expert baking skills. The magic lies in its layering: the buttery, nutty crust provides a decadent base, the green lime cream layer adds a pop of color and tartness, the vanilla-cream cheese layer delivers richness, and the strawberry-gelatin top with real berries gives bright flavor and texture. It’s an easy comfort food for family dinners that doubles as a showpiece.
For best results, use a 9×13-inch glass dish—it showcases the beautiful layered effect like a dessert bar. Always let each layer chill before adding the next to prevent mixing. For a lighter version, substitute equal parts Greek yogurt for cream cheese. Want more texture? Add chopped nuts to the whipped layers. And don’t skip the chill time—this Layered Christmas Dessert is worth the wait. Serve with coffee, eggnog, or a red wine spritzer for the ultimate creamy Christmas treat experience.
Storage, Freezing, and Reheating Tips
Store leftovers in the refrigerator, tightly covered with plastic wrap or a lid, for up to 5 days. The fresh strawberries will soften slightly but remain delicious. Avoid keeping it longer than that for optimal flavor and texture.
This holiday no-bake dessert does not freeze well due to the gelatin and whipped topping, which can separate and become watery upon thawing. However, you can make this ahead! The entire Christmas Lush can be assembled 1–2 days in advance and stored in the fridge. Just wait to add the final whipped topping and sprinkles 1–2 hours before serving to keep decorations fresh.
To serve, allow the dessert to sit at room temperature for 10 minutes if overly firm—this makes slicing easier. Always use a clean, warm knife for clean cuts. Leftovers make a delightful after-dinner snack or afternoon treat!
People Also Ask: Christmas Lush
What is a “lush” dessert?
A “lush” dessert is a retro-style, layered treat known for its lush, indulgent texture and vibrant colors. Originating in mid-20th century American home cooking, it typically consists of multiple layers—crust, cream, gelatin, and fruit—stacked in a glass dish. The name comes from the rich, luxurious feel of each bite. Popular versions include 4th of July, Easter, and Christmastime lush desserts, especially Layered Christmas Dessert recipes like this one. These holiday no-bake desserts are beloved for their simplicity, no-oven convenience, and ability to feed a crowd with minimal effort—perfect for busy families.
How do you make Christmas lush?
To make Christmas Lush, start with a buttery nut crumb crust and bake it lightly. Then build four distinct creamy Christmas treat layers: a green lime gelatin mixed with cream cheese and whipped topping, a sweetened cream cheese and whipped mixture, fresh strawberries, and a red strawberry gelatin poured over the top. Each layer is poured and chilled before the next is added. The result is a Layered Christmas Dessert that’s vibrant, creamy, and refreshing. It requires no oven after the crust, making it a go-to holiday no-bake dessert that’s easy for beginners.
What layers are in a Christmas lush dessert?
A classic Christmas Lush has five main components: a nutty, buttery crust; a green lime-cream cheese layer; a sweetened white cream layer; fresh sliced strawberries; and a top layer of red strawberry gelatin. These layers create a holiday no-bake dessert with contrasting textures—crisp, creamy, juicy, and gelatinous—all in one bite. The visual appeal of red and green makes it a seasonal favorite. Optional toppings like whipped cream and sprinkles complete the festive look. This balance ensures it’s not too sweet, not too wiggly, and always satisfying.
Can you make a lush dessert ahead of time?
Yes! One of the biggest advantages of a holiday no-bake dessert like Christmas Lush is that it can be made 1–2 days in advance and stored in the refrigerator. Assemble all layers in a 9×13-inch dish and chill until firm. Just avoid adding the final whipped topping and sprinkles until a few hours before serving to keep them fresh. This makes it ideal for busy holiday weeks when you want to minimize last-minute stress. Plan ahead, chill properly, and enjoy a flawless Creamy Christmas Treat when guests arrive!
Conclusion: Christmas Lush – A Holiday Tradition in the Making
If you’re searching for a Creamy Christmas Treat that looks like it came from a professional kitchen but is simple enough for your Sunday supper, Christmas Lush is your answer. This Layered Christmas Dessert proves that holiday magic doesn’t have to be complicated—just delicious, colorful, and made with love. Whether you’re serving it after Christmas turkey, at a winter cocktail party, or as a sweet note to a cozy family dinner, it’s guaranteed to spark smiles and second helpings.
We’d love to see your creation! Snap a photo, garnish with extra berries, and share your version with #MyChristmasLush. Did you try a variation? Let us know in the comments—your ideas help other home bakers find their new favorite holiday no-bake dessert. From our kitchen to yours, may your holidays be full of joy, comfort, and, of course, lush desserts.
You Might Also Like:
– Spooky Lychee Eyeballs Recipe – Easy Halloween Treat Idea!
– 4Th of July Cake Mix Whoopie Pies: A Festive Patriotic Treat Everyone Will Love
– Spooky Spider Cookies 🕷️ | Easy Halloween Treat Recipe!
– 4th of July Parfaits – The Best Red, White & Blue Dessert Idea
Find Us On Pinterest and Facebook.
Print
Christmas Lush
- Total Time: 25 minutes
- Yield: 12 servings 1x
- Diet: Vegetarian
Description
Creamy, dreamy, and layered with festive flavors, this Christmas Lush is an easy no-bake dessert that’s perfect for your holiday table.
Ingredients
- 1 package (14 oz) golden Oreos, crushed
- 1/2 cup unsalted butter, melted
- 1 package (8 oz) cream cheese, softened
- 1 cup powdered sugar
- 1 tub (8 oz) Cool Whip, thawed
- 2 boxes (3.4 oz each) instant pistachio pudding mix
- 2 1/2 cups cold milk
- 1/2 cup red and green sprinkles
- Extra Cool Whip and crushed cookies for topping (optional)
Instructions
- In a bowl, mix crushed Oreos with melted butter. Press into the bottom of a 9×13 inch dish to form the crust. Chill for 10 minutes.
- In another bowl, beat cream cheese and powdered sugar until smooth. Fold in 1/2 tub of Cool Whip.
- Spread the cream cheese layer over the crust.
- In a separate bowl, whisk pudding mixes with cold milk until thickened, about 2 minutes.
- Spread the pudding layer over the cream cheese layer.
- Top with remaining Cool Whip and smooth evenly.
- Sprinkle red and green sprinkles on top and garnish with extra crushed cookies if desired.
- Chill for at least 4 hours or overnight before serving.
Notes
Switch up the pudding flavor for variety—peppermint, vanilla, or white chocolate work great too! Best served cold.
- Prep Time: 25 minutes
- Cook Time: 0 minutes
- Category: Dessert
- Method: No-Bake
- Cuisine: Holiday
Nutrition
- Serving Size: 1 square
- Calories: 310
- Sugar: 22g
- Sodium: 250mg
- Fat: 18g
- Saturated Fat: 10g
- Unsaturated Fat: 7g
- Trans Fat: 0g
- Carbohydrates: 34g
- Fiber: 0g
- Protein: 3g
- Cholesterol: 35mg
Keywords: christmas lush, no bake dessert, pistachio lush, holiday layered dessert, festive treat